How to Recaulk Your Kitchen Sink: A Comprehensive Guide
If you’re tired of seeing cracked and dirty caulk around your kitchen sink, it’s time to take matters into your own hands. Recaulking your kitchen sink not only improves its appearance but also helps prevent water damage. In this detailed guide, we’ll walk you through the step-by-step process of how to recaulk kitchen sink. We’ll cover everything from choosing the right caulk to removing old silicone sealant for sink. Let’s dive in!
Selecting the Right Caulk for Kitchen Sink
Choosing the appropriate caulk for kitchen sink is crucial to ensure a long-lasting seal. Here’s how to make the right choice:
- Understand Sink Materials: Consider the material of your sink, whether it’s stainless steel, porcelain, or composite granite, to choose a caulk that adheres well.
- Waterproof Caulk: Opt for a waterproof caulk to prevent water from seeping through and causing damage.
- Silicone vs. Acrylic: Understand the differences between silicone sink caulking and acrylic caulk and their pros and cons.
- Color Matching: Match the caulk color with your sink to achieve a seamless look.
Removing Old Caulk around Sink
Before applying new caulk, you must remove the old one properly. Here’s how:
- Gather Your Tools: Get a utility knife, caulk remover tool, and a scraper.
- Cut and Loosen: Carefully cut along the edges of the old caulk and gently loosen it with the remover tool.
- Scrape Residue: Use the scraper to remove any remaining caulk residue.
Preparing the Sink
Proper preparation ensures a clean and effective caulking job:
- Clean Thoroughly: Remove any dirt, debris, or soap scum from the sink’s edge.
- Dry Completely: Ensure the sink’s edge is dry before applying new caulk.
- Masking Tape: Apply masking tape to create clean edges for the caulk.
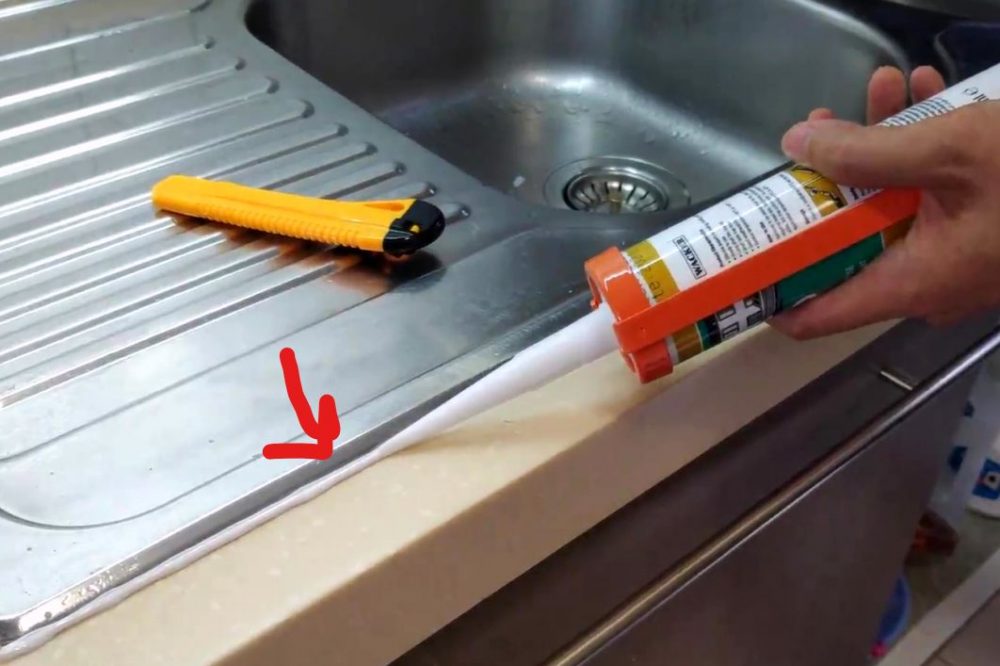
Applying the New Caulk Kitchen Sink
Now comes the crucial step of applying the new caulk kitchen sink:
- Cut the Caulk Tube: Cut the tip of the caulk tube at a 45-degree angle to control the flow.
- Start Caulking: Begin caulking by applying even pressure on the trigger and moving steadily along the sink’s edge.
- Smooth with Finger: Wet your finger and run it along the fresh caulk to create a smooth finish.
- Remove Tape: Carefully remove the masking tape before the caulk dries.
Drying and Curing
Allow the caulk to dry and cure properly for the best results:
- Drying Time: Check the caulk’s label for the recommended drying time.
- Avoid Water: Avoid using the sink or getting it wet during the drying period.
- Curing Time: It may take a day or two for the caulk to fully cure, so be patient.
Common Issues and Troubleshooting
Sometimes, issues may arise during the recaulking process. Here’s how to address them:
- Caulk Won’t Stick: Ensure the surface is clean and dry; you may need to use a caulk primer.
- Uneven Caulk Line: Practice steady hand movements for a neater finish.
- Caulk Cracks: If cracks appear, remove the old caulk and reapply a new bead.
- Caulk Peels Off: Make sure the sink’s edge is completely dry before recaulking.
Maintenance Tips for a Lasting Seal
Maintaining your newly caulked kitchen sink is essential for its longevity:
- Regular Cleaning: Clean the caulked area regularly to prevent mold and mildew buildup.
- Avoid Harsh Cleaners: Use mild cleaners to avoid damaging the caulk.
- Inspect Periodically: Check for signs of wear or damage and recaulk as needed.
- Address Leaks Promptly: If you notice water leaks, address them immediately to prevent further damage.
FAQs
How often should I recaulk my kitchen sink?
You should recaulk your kitchen sink every 2-3 years or when you notice signs of wear and tear.
Can I use the same caulk for all sink materials?
No, it’s essential to choose a caulk that’s compatible with your sink’s material for the best results.
What should I do if the caulk cracks?
If cracks appear, remove the old caulk, clean the area, and reapply a new bead of caulk.
Is it necessary to use masking tape when caulking?
Using masking tape helps create clean and precise caulk lines, but it’s optional.
Can I use the sink immediately after caulking?
It’s best to avoid using the sink for at least 24 hours to allow the caulk to dry and cure properly.
How do I prevent mold and mildew in the caulked area?
Regularly clean the caulked area and ensure it stays dry to prevent mold and mildew growth.
Conclusion
Recaulking your kitchen sink is a manageable DIY task that can enhance the appearance of your kitchen and protect it from water damage. By following these steps and tips, you can achieve a professional-looking seal that will last for years. Say goodbye to cracked and unsightly caulk, and enjoy a refreshed kitchen sink!