How to Clean a Pull-Down Spray Head on Your Kitchen Faucet: A Step-by-Step Guide
The pull-down spray head on your kitchen faucet is a convenient feature that allows for easy cleaning and rinsing of dishes. However, over time, mineral deposits, grime, and buildup can accumulate on the spray head, affecting its performance and water flow. Cleaning your pull-down spray head regularly is essential to maintain its functionality and ensure optimal water pressure.
In this guide we will walk you through cleaning a pull-down spray head on your kitchen faucet effectively. Let’s get started and restore the performance of your spray head.
1. Understanding the Importance of Cleaning Your Pull-Down Spray Head
Cleaning your pull-down spray head is crucial for several reasons. Over time, mineral deposits from hard water can clog the spray nozzles, reducing water flow and pressure. Additionally, food particles and residue can accumulate, leading to potential bacterial growth. Regular cleaning ensures proper functionality, improves water pressure, and promotes hygiene in your kitchen.
2. Precautions Before Cleaning: Safety and Care Tips
Before you begin cleaning your pull-down spray head, it’s important to take the necessary precautions:
- Turn off the water supply to the faucet to prevent accidental spraying or leaks.
- Place a towel or cloth in the sink to catch any small parts that may fall during disassembly.
- Use gentle cleaning solutions and avoid abrasive tools that could scratch or damage the spray head.
By following these safety and care tips, you can protect yourself and the spray head during cleaning.
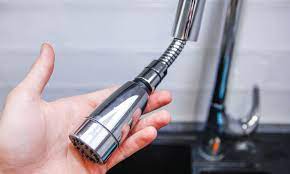
3. Removing the Spray Head: Disassembling for Cleaning
Start by locating the connection point between the spray head and the hose. Most spray heads can be unscrewed by hand, while others may require the use of pliers. Twist counterclockwise to loosen and remove the spray head from the hose. If there is a weight attached to the hose, detach it as well. Place the spray head on a clean surface for further cleaning.
4. Soaking in Vinegar Solution: Dissolving Mineral Deposits
Prepare a solution of equal parts white vinegar and water in a bowl or container. Submerge the disassembled spray head in the vinegar solution, ensuring that all the nozzles are fully covered. Allow it to soak for approximately 30 minutes to dissolve mineral deposits and grime. The mild acidity of vinegar helps break down the buildup, restoring the spray head’s performance.
See more: How to Replace a Single Handle Kitchen Faucet
5. Scrubbing and Rinsing: Removing Buildup and Residue
After soaking, use a soft brush or toothbrush to gently scrub the spray head, focusing on the nozzles and crevices. This helps remove any remaining residue and dislodges any stubborn deposits. Rinse the spray head thoroughly under warm water to wash away loosened debris. Ensure that all nozzles are clear and free from obstruction.
6. Reassembling and Testing: Restoring Functionality
Once the spray head is clean and rinsed, reattach it to the hose by twisting it clockwise until snug. If a weight was detached earlier, reattach it to the hose in its original position. Turn on the water supply and test the spray head for proper functionality. Check the water flow and pressure to ensure that it has been restored to its optimal level.
FAQs
Q: How often should I clean my pull-down spray head?
A: It’s recommended to clean your pull-down spray head every few months or as needed, depending on the water quality and frequency of use. Regular maintenance helps prevent buildup and ensures optimal performance.
Q: Can I use harsh chemicals to clean my spray head?
A: It’s best to avoid harsh chemicals as they can damage the finish of the spray head. Stick to gentle cleaning solutions like vinegar or mild dish soap to clean and remove deposits effectively.
See more: How to Fix a Leaking Kitchen Faucet
Q: What if the spray head is still not working properly after cleaning?
There may be other issues if the spray head continues to have reduced water flow or pressure after cleaning. Check the hose for any kinks or obstructions and ensure that the water supply is fully open. If problems persist, consult a professional plumber for further assistance.
Q: Can I clean the spray head while it’s still attached to the hose?
It’s generally more effective to remove the spray head for thorough cleaning. Cleaning it while attached to the hose may not allow you to access all the nozzles and crevices, hindering the cleaning process.
Q: How do I prevent mineral deposits on the spray head?
To minimize mineral deposits, consider using a water softener or installing a water filtration system. Regularly cleaning and descaling your spray head can also help prevent the buildup of mineral deposits.
Q: Are there any additional maintenance tips for my pull-down spray head?
To maintain the performance of your pull-down spray head, periodically check the hose for leaks or damage and replace it if necessary. Wipe down the spray head with a damp cloth to remove any surface residue after each use.
Conclusion
Regularly cleaning your pull-down spray head is essential to maintain its functionality and ensure optimal water flow and pressure. By following the step-by-step guide provided in this article, you can effectively remove mineral deposits and buildup, restoring the performance of your spray head. Remember to take necessary precautions, use gentle cleaning solutions, and avoid abrasive tools that could damage the spray head. With a clean and well-maintained pull-down spray head, you can enjoy the convenience and efficiency it provides in your kitchen.