How to Fix a Loose Kitchen Faucet: A Comprehensive Guide
A loose kitchen faucet can be an annoying problem that not only affects the functionality of your sink but also leads to potential water leakage. If you’re experiencing a wobbly or loose faucet, it’s essential to address the issue promptly to prevent further damage. In this comprehensive guide, we will provide you with step-by-step instructions on how to fix a loose kitchen faucet. Whether you’re dealing with a single-handle or a double-handle faucet, we’ve got you covered. So, let’s dive in and learn how to tighten that loose faucet.
Table of Contents
- Understanding the Issue: Causes of a Loose Kitchen Faucet
- Safety First: Precautions Before Fixing the Faucet
- Tools of the Trade: Equipment You’ll Need
- Tightening a Single-Handle Faucet: Step-by-Step Instructions
- Fixing a Double-Handle Faucet: Method for Stabilizing
- Prevention is Key: Tips to Avoid Future Faucet Looseness
- Frequently Asked Questions (FAQs)
- Conclusion
1. Understanding the Issue: Causes of a Loose Kitchen Faucet
A loose kitchen faucet is often caused by regular usage, wear and tear, or improper installation. Over time, the nuts and bolts that hold the faucet in place may loosen, leading to instability. It’s important to identify the cause of the looseness before proceeding with the repair to ensure an effective and long-lasting solution.
2. Safety First: Precautions Before Fixing the Faucet
Before attempting to fix a loose kitchen faucet, it’s crucial to take necessary safety precautions. Start by turning off the water supply to the faucet. Locate the shut-off valves under the sink and turn them clockwise to cut off the water flow. This prevents any accidental leaks or water damage while working on the faucet.
3. Tools of the Trade: Equipment You’ll Need
To fix a loose kitchen faucet, you’ll need a few essential tools. These may include an adjustable wrench, pliers, a screwdriver (Phillips or flathead), and plumber’s tape. Having these tools readily available will make the repair process smoother and more efficient.
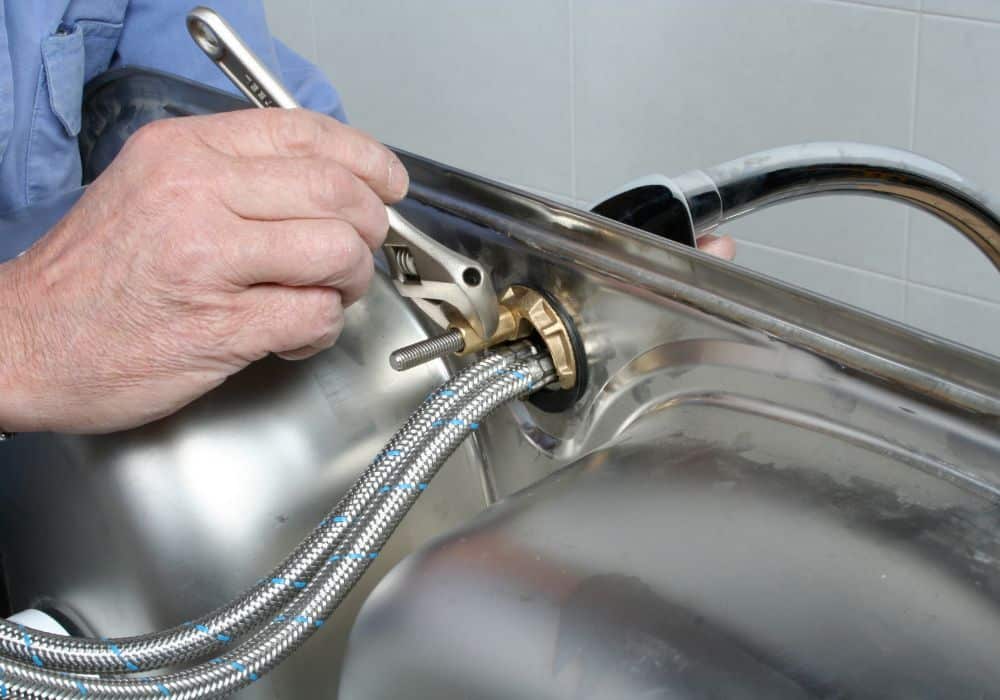
4. Tightening a Single-Handle Faucet: Step-by-Step Instructions
For single-handle faucets, follow these step-by-step instructions to tighten the loose parts:
- Locate the set screw: Underneath the faucet handle, there is usually a small set screw. Use a screwdriver to tighten this screw by turning it clockwise.
- Access the valve: Remove the decorative cap on top of the faucet handle, if present. This will expose the valve and stem. Use an adjustable wrench to tighten the valve by turning it clockwise.
- Test the faucet: Turn on the water supply and check if the faucet is now stable and secure. If there is still some looseness, proceed to the next step.
- Check the mounting nut: Under the sink, locate the mounting nut that holds the faucet in place. Use an adjustable wrench or pliers to tighten this nut by turning it clockwise.
- Reassemble the faucet: Once the mounting nut is tightened, reassemble the faucet handle and decorative cap. Test the faucet again to ensure it is securely fixed.
5. Fixing a Double-Handle Faucet: Method for Stabilizing
To fix a loose double-handle faucet, try the following method:
- Turn off the water supply: Shut off the water using the shut-off valves under the sink.
- Remove the handles: Use a screwdriver to remove the screws holding the handles in place. Take off the handles to access the stems.
- Tighten the stem nuts: Use an adjustable wrench to tighten the stem nuts beneath each handle. Turn them clockwise to secure the stems.
- Reassemble the faucet: Once the stem nuts are tightened, reattach the handles and secure them with the screws. Turn on the water supply to test the faucet’s stability.
6. Prevention is Key: Tips to Avoid Future Faucet Looseness
To prevent future looseness in your kitchen faucet, keep these tips in mind:
- Regularly inspect the faucet and tighten any loose parts as soon as you notice them.
- Avoid excessive force when turning the handles, as it can cause wear and tear.
- Hire a professional plumber for proper installation to minimize the risk of future looseness.
By following these preventative measures, you can prolong the lifespan of your kitchen faucet and avoid unnecessary repairs.
See more: How to Unclog a Kitchen Sink with Standing Water
FAQs
Q: Can I fix a loose faucet without professional help?
A: Yes, fixing a loose faucet is often a DIY task that can be done without professional help. However, if you’re unsure or uncomfortable with the repair process, it’s best to consult a licensed plumber.
Q: What should I do if the faucet remains loose after tightening?
A: If the faucet remains loose after tightening, it may be due to more severe issues. In such cases, it’s advisable to contact a plumber to assess and repair the problem.
Q: How often should I inspect and tighten my kitchen faucet?
A: It’s recommended to inspect and tighten your kitchen faucet at least once every six months. Regular maintenance can help identify and address any potential looseness before it worsens.
Q: Is plumber’s tape necessary during the repair process?
A: Plumber’s tape is often used to create a watertight seal between threaded connections. It can be beneficial to apply plumber’s tape to prevent leaks and ensure a secure fit.
Q: Can a loose faucet lead to water wastage?
A: A loose faucet can contribute to water wastage, as even small leaks can result in significant water loss over time. Fixing a loose faucet promptly can help conserve water and reduce your utility bills.
Q: Are there any long-term consequences of neglecting a loose kitchen faucet?
A: Neglecting a loose kitchen faucet can lead to further damage, including water leakage, pipe corrosion, and potential structural issues. It’s important to address the problem as soon as it’s noticed.
Conclusion
Fixing a loose kitchen faucet doesn’t have to be a daunting task. By following the step-by-step instructions provided in this guide, you can tighten the loose parts and restore the stability of your faucet. Remember to prioritize safety, gather the necessary tools, and take preventative measures to avoid future looseness. If you encounter any difficulties or prefer professional assistance, don’t hesitate to reach out to a licensed plumber. With a securely fixed faucet, you can enjoy a fully functional and leak-free kitchen sink.